

I did some flower pressing with the children in the summer - the youngest loved it and we made a card for Grandad. This time I thought we'd have a go at bookmarks, inspired by some fantastic leaf art in The Big Ideas Book. One top tip is to press the leaves (once they're dry) in an old phone book - very quick and easy, but be careful when you're moving it about because it's floppy, and you don't want them all dropping out...speaking from experience...

Weigh it down with something heavy, and leave for about a week.
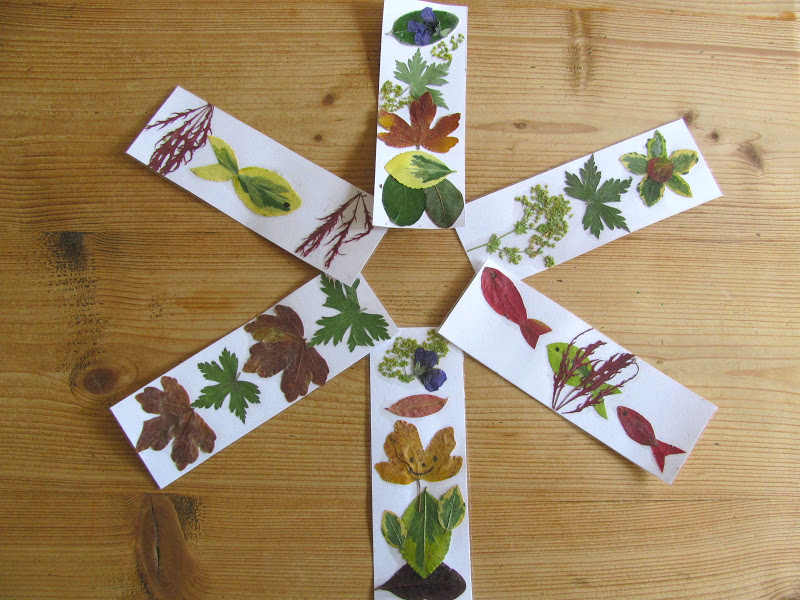
When you're ready, hold the phone book over some newspaper, flick through, letting the leaves fall. Now the fun starts! I cut out bookmarks from some white card - ours were 5cm by 15cm, but you could draw around one you have, or make them any shape you like.
The kids are always impatient to start sticking, but best to get them to lay out the leaf pattern they want on the card first.

Lots of different shapes, colours and sizes means you can really get creative. Flowers and fish are easy to do - we cut a V into a leaf for the fish tail and a frilly, delicate one made a good underwater plant. And don't you think ferns would work well for christmas trees?

To finish off, the kids wrote a message on the other side, before the bookmarks were covered in clear sticky back plastic.

Make sure you cut enough from the sheet to go over both sides + a bit more. Pull half the back off the plastic, and put the leaf picture down on the sticky side, then fold the covering tight against the edge of the card and slowly, carefully remove the rest of the backing paper, smoothing down as you go. I did this for the kids, and kept an eye on them as they cut off the extra bits and neatened them up.

We've kept ours quite simple but if you want to jazz them up, you can draw a border round the edge of the bookmark or add a tassel or ribbon at the bottom.
I layered leaves for this butterfly picture, and stalks make perfect antenna. So many possibilities!

Next time paper houses.
Linking up with Country Kids at Coombe Mill and For the Kids Friday - LOADS of fun ideas to keep your little ones busy..