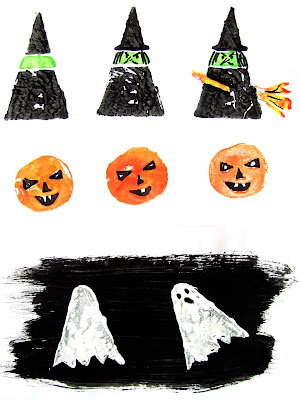
These witchy witches would make good decorations for a Halloween party.
Showing posts with label Halloween craft. Show all posts
Showing posts with label Halloween craft. Show all posts
29.10.19
14.10.19
Simple shape potato printing for Halloween!
I'm LOVING potato printing! And there's so much you can do with simple shapes. Perfect for pictures, decorations and cards, and fun for all ages. The theme here is Halloween, but I'll definitely be trying out some other ideas in the run up to Christmas.
Triangles pop up a fair bit! For the witch, cut a potato in half. Slice a sliver off the bottom of your potato half, so it sits flat and is easier to work with.
Either use a ruler and pen and draw on a triangle, and then score using the ruler and a sharp pencil, or score straightaway.

Start with the base line of the triangle and take it right to the edges. Roughly mark the midpoint of the base line at the top of the potato, and score lines up to this mark.
Use a piece of kitchen roll to wipe away potato bits and moisture.
For the witch's face, score a line across the triangle, a few cms from the tip and another just below it.
We found the easiest thing to do next was to cut the triangle out on the score lines.
TIP: (To be done by an adult) Cut two wedges away, either side, at back, leaving a ridge of potato to hold onto. A sort of potato handle! Easier for little hands.
When the paint is dry use a black pen to add a wicked witchy face, hair and a brim for her hat.
We used the side of a piece of coffee stirrer and a mix of yellow and orange paint to print on a broomstick.
The ghost also starts off as a triangle too. Draw and score as before. This time I used a sharp knife to cut away slivers up to the score line, to define the triangle (to be done by an adult) - though you could completely cut away the sides again, like we did with the witch.
Once the triangle is defined, draw and score a line to round off the top of the triangle, then slice up to the score line. Draw and score a zigzag along the bottom and slice across the potato, up to the score line again.
As it's one colour printing, you could make your own stamp pad.
Soak a piece of thin, damp kitchen sponge in some white paint. We put ours in a small recycled clear plastic pot, (think it had been a humous pot!) then you can pop the lid back on to stop the paint drying out too fast. But when you've finished printing, let the sponge air dry (it could eventually get mouldy if it stays wet) and just wet with water and add more paint when you want to use again.
Or you could brush on a layer of paint.
Print on coloured paper or paint a black background first, and let it dry.
When your ghosts are dry, use a black pen to draw on a hauntingly spooky face.
For the pumpkin, the shape is there already! You can either carve a face or simply print the round shape and add a face when the paint is dry.
We cut out small triangles for eyes and a nose, and a semi circle for the mouth.
The bat is made from two small triangle shapes. First, draw and score a thin triangle, curve the base inwards to define the bat's ears, and slice slivers away around the sides, or cut out completely, like the witch.

The second triangle should be a similar size, but wider - use the curved edge of your potato for one of the sides.
Print the narrow triangle first, tip pointing down, this is your bat's body.
Use the other triangle for the wings - print two either side, overlapping them and make sure the curved edge is at the top.
Dot on some yellow paint for eyes and when dry, add a black centre with the pen.
Happy Halloween!
31.10.18
Pop-up matchboxes
I love a matchbox - any tiny box really, and I bought a job-lot of them for a pound in Home Bargains the other day. I've been wanting to try a simple pop-up matchbox idea, and Halloween seemed like the perfect time!
It took a few attempts to work out where to cut and where to stick... but we got there in the end! And once you've made the pop-up mechanism, you can add any ghostly, ghastly ghoul you like..
1. Rather handily, our matchbox had lines on it already, but basically you need to draw two lines, a few cms apart, down the middle of your box top.
Take them really close to one end, and draw a line across (this is important! See above), leaving the other open (about 0.5cm from the edge). We've coloured this open end with the black pen so it's a bit easier to see which end's which. (And this black mark will become dracula's shoes later!)
2. Adult help is needed for this next part - use some nail scissors or similar to pierce a hole through the line on the matchbox top (keep the scissors closed, press down firmly and twist from side to side). Once you've pierced through, cut carefully along the 3 lines you've drawn, leaving the end with the space (or the thick black mark in the picture).
3. Fold this flap of card right back and press firmly.
4. Then fold the flap of card in half and press the crease firmly again.
5. Cut a strip of paper, about the same width as the card strip, and roughly 4cm long.
6. Glue a good section of it under the card flap and let the glue dry.
7. Now the more fiddly bit, because you need to glue the other end of the paper strip to the end of the matchbox drawer.
Take the match box drawer out of the cover and dab some glue at the end and bottom of the cardboard drawer. Then push it back in from the thick black mark side (not the paper strip side), gluey end first, until it's half in, and
Take the match box drawer out of the cover and dab some glue at one end of the cardboard drawer (end side and bottom). Then gluey end first, push it back in from the thick black mark side (not the paper strip side), until it's half in, and you can see the gluey end through the hole in the top of the matchbox cover.
8. You need to stick the paper strip to the glue, this is tricky, so we used the end of a pencil to push the paper strip into the glue (end side and bottom).
It is really important to get the cardboard strip as close as you can to the edge of the drawer - there should be a small gap, but it must be small, or the mechanism won't pull back properly. (See how close it is in the photo. We've drawn a black line along the top edge of the matchbox drawer, so you can see how close it is to the edge of card strip.)
9. Once it's dry you can try out your pop-up box! When you push the drawer back into the cover, the middle section should go flat. If it doesn't, then the card strip needs to be glued closer to the end of the drawer. If the box is too tight and won't shut properly then the card strip has been glued too close to the end of the drawer and needs more of a gap.
11. Draw your Halloween figure on some paper - make it roughly the same size as the matchbox.
12. Make sure the matchbox is open so the mechanism is sticking up, and glue your ghoul to the side of the folded card strip that isn't attached to the paper strip, lining up the bottom edge of your figure with the crease.
30.10.17
Spooky bat leaf decorations
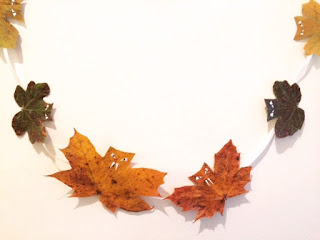
This is a very quick and easy Halloween craft idea that makes use of colourful autumn leaves. We collected leaves that were a sort off maple-leaf shape (field maple, acer, sycamore even ivy leaves) - definitely not hard to find once you start looking!
1. Then just one cut - to snip off the middle pointy part of the leaf, like so. Curve the cut a little, for bat ears.
2. Keep the stalks on for instant ‘flying’ bats (like the first photo), and glue on paper eyes and fangs (see step 4).
3. The leaves will quickly start to curl once they’re inside, so if you want them to last longer, press for a few days after you've cut them.
If you don’t have a flower press, put the leaves between the pages of an old book and then place a pile of books on top.
Once they’re pressed they’ll be flat, but more brittle, so need to be handled with some care.
4. For the eyes and fangs, we cut small, long triangles from some plain paper. Rub glue stick carefully over the head part, where you want the eyes and fangs to go, then wet your finger to pick up the little triangles and stick them in place. Use a black pen to finish off the eyes.
To make them last a bit longer you could varnish the leaves with a clear, water-based varnish.
5. To make bat bunting, we glued our bats onto some flat gift-wrap ribbon. Stick them on near their heads, so they don’t tip forward. (I forgot to do this...)
You could make a Halloween collage with them too.
Subscribe to:
Posts (Atom)


