Showing posts with label Kids Get Crafty. Show all posts

30.10.13

Mini Halloween figures - Part 2

What to do with a bucketful of pumpkin pieces?
Not so keen on pumpkin pie; soup is fine (especially good with apple), but this year I was thinking something sweet like muffins, and then as if by spooky magic, Emma's recipe for spiced pumpkin muffins popped up on my blog list, so we'll be having a go at that later.


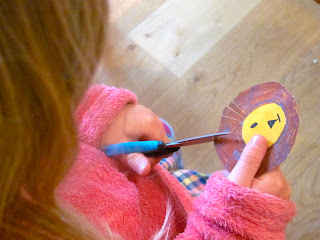
Back to the cardboard pumpkin, (ghost and bat are here) and you'll need to cut two egg cups from your box. Keep them shallow and as even as possible, so you can stick them together. But before getting the glue out, use your fingers and thumbs to press the egg cup bottoms, making them more dome shaped.


Splosh on some orange paint and when dry, use a felt tip for the face. Make a hole in the top, roll a small piece of green paper as tightly as you can for the stalk and push it in.


A little more work for the witch, but hopefully worth it.

You'll need a small cone from the middle of the box. Paint it black, leaving a space for the face.
Having a green egg box was a bonus, but if yours is another colour, just paint the face when the black's dry.


Cut a small triangle from spare egg box card for the witch's nose. Fold this little bit of card in half, make a hole with nail scissors (keep them closed, press down and twist from side to side) in the middle of the face and wedge the pointy nose in.


We stuck on some brown wool for hair, but coloured tissue paper would work well too.
Draw a witchy mouth and eyes with a felt-tip.

The hat is made from two small circles. We had no black paper so just coloured some in.


The smaller circle sits on her head, cut the the larger one in half. Twist and glue it into a cone shape. Use plenty of glue to stick the cone to the bottom of the hat.

Make her broomstick by wrapping and gluing a rectangle of tissue paper (or ordinary paper) around the end of cocktail stick. Snip the paper to make it more broom-like.


Make holes in the witch's body (with the nail scissors) - higher at the front than the back, so her broomstick sits at an angle.


Cut a strip for arms from your black paper, making it wider at both ends for the flared sleeves. then glue in place.


The plan was to come up with a game using these mini figures, but that's going to have to wait..


Happy Halloween!

Linking up with Kids Get Crafty
14.6.13

Shell pictures

We've had a big bag of shells knocking about the house since our beach trips to the Gower a few weeks ago. Most of them were gathered at Rhossili, and they're quite large things like razors, marine snail shells, whelks, mussels and cockles (some still with wizened, whiffy occupants..)
Too big basically to make more ladies with prams like last time.
So I've put some around plants in a flowerbed/rockery, but kept smaller, pretty shells like this to make a picture for Nanny's Birthday. It's a tellin shell, and quite a lot of the ones we found were still joined together.


So first off, my 6 year old painted a thin piece of card blue, leaving a few cms at the bottom.  You could cut out part of cereal packet and use that instead, if you don't have any plain card.


While it was drying we put some broken shells in a plastic bag and bashed them. Very popular this bit! But don't smash them to smithereens - looks better I think if there's a mix of different sizes.


When the blue is dry, we added some fluffy white clouds using an old sponge, and then covered the bit left at the bottom with a good layer of craft glue before sprinkling over all the shiny shell pieces.


Shake off any loose stuff.
Then glue on the butterflies.


Just match up some shells if the ones you've got aren't in pairs, or experiment with cockles and mussels. Perfect for flower pictures too, and all kinds of other things really. Once you get going the world's your oyster (shell).

Linking up with Red Ted Art's Kids Get Crafty

1.5.13

Roll up to the Zoo!

If I had to pick a favourite crafty thing to do with the kids it would be making animals out of cardboard tubes. There are herds of them around the house which is probably a bit of a giveaway. Our production line started with cats, bats and owls, inspired by my trusty old 70's craft book - and there's no end of wonderful ideas on the web. It appears you can make just about anything out of a loo roll middle.
I've been squirrelling them away for months...Honestly, I've enough for a zoo...so that's exactly what we thought we'd do. A Zoo! The plan is to make an animal or two every week (hopefully!) using loo roll tubes and the odd cereal/egg box...

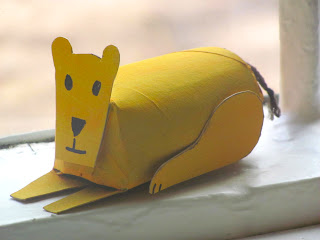
First off, lions. RAWR!

You'll need two tubes, part of a cereal packet, craft glue, paint and possibly a little bit of wool.

For the sitting lion, glue the top of the tube together and leave to dry - paperclips help with this bit. For the lying down lioness, draw 4 narrow triangles evenly spaced around one end. They don't need to be perfect..


.. mine were about 3cm long with a 1cm base. Cut out the triangles, then fold two opposite tabs inwards, and fold and glue one of the other tabs over the top of them.
The tab that's left is the front paws and just needs a snip out of the middle to make it look paw-like.
Worth squashing the tube down a little at this stage to flatten the bottom, so it doesn't roll about.
I also cut the corners off the sitting lion, but it's fine to leave them.


Painting time next, and splosh some on part of a cereal box as well as the tubes.


A ball of newspaper in the end of the lying down lioness rounds things off, but miss this bit out if you want.

When it's nice and dry use a cup or something handy to draw a circle, with a smaller circle inside (bottom of a vitamin bottle was perfect for this) You'll also need to draw two front paws, a lioness head and her hind legs, which look a bit like chicken drumsticks.
Paint or colour-in the outer circle of the lion's mane..


Cut everything out, then get mane snipping. Great scissor practice! My daughter loved this bit.


Glue everything in place - you could cut out a paper tail too, but we used a piece of wool - knot near the end and fray the bottom bit.


Just lose the mane, draw or paint on some lines, and you've got a tiger ...or spots for a leopard.

Anyway, it's a start! My mini-maker has asked for a zebra next time...

UPDATE: Our Zoo is expanding! So thought I'd add instructions for a zebra and a giraffe,  an elephant, a hippo and a rhino, penguins, turtles, monkeys...

Linking up with Kids Get Crafty

29.3.13

Shiny Happy Easter Craft

One of my most popular craft ideas ever, because it involved eating a bag of these..


Obviously there'll be mountains of them being munched over the weekend, so thought I'd post this now in case you fancy a go, and want to salvage some foil before it gets ripped to shreds and ends up in the bin...or sprinkled about the place like tiny shiny bits of confetti that you'll be hoovering up for weeks..


The trickiest bit is getting the foil wrapping off in one piece..or even two. Then you just need to decide what to decorate. We went for a butterfly and a dragonfly. I drew half the shape on a folded piece of cereal packet - cut out and open up.
.

We flattened our bits of foil and cut them into strips and squares. A glue stick worked best - the foil can be fiddly and sticks to fingers with over enthusiastic gluing!
My daughter spread some on the cardboard first before sticking down the pieces she wanted for her foil decoupage.


Very impressed how she mirrored the pattern on the wings.

It really doesn't matter if bits hand over the edge because they can be tucked neatly around the back.


Turns out we needed more coloured foil than I bargained for, so had to break into another Easter egg... shucks hey? I think this is what you call craft with benefits.

Please excuse blatant advertising! We used every decent sized scrap we had..


A pipe cleaner taped to the back makes good butterfly antennae and we added a few more shiny bits.
You could make smaller ones and attach them to plant sticks - they'd look good fluttering above a herb pot.

I think there's a very strong chance we'll be making more next week!

Hope you have a lovely Easter.


Linking up with Red Ted Art's Kids Get Crafty and For the Kids Friday

6.3.13

Make Mr Twit's Beard for World Book Day

I've never had to think about the kids dressing up as a favourite character for World Book Day. Their school seemed to buck the trend and just didn't bother...until now that is.
So over the past few days I've experienced the same kind of last minute fretting and dressing up box delving I'm sure many parents are well used to. I've heard tales from friends of things getting wildly competitive, with elaborate hand stitched costumes, and jaw-dropping make up, but can't imagine that happening at our little village school. I don't think? Anyway, after all kinds of ideas, I managed to steer my three towards Simple.
The eldest opted for teenage spy, Alex Rider - so just himself really, plus cool shades; the youngest chose Angelina Ballerina - ballet stuff with paper ears attached to a headband, and the 8 year old came up with Roald Dahl's Mr Twit, because that's what he's reading at the moment.

And Mr Twit is all about the beard.

We made ours out of a cereal packet.
I lightly folded the card and drew half a beard, before cutting it out so it looked even.


It's important to leave longish sideburns, because these are going to be folded over and stapled onto the arms of a pair of glasses. We used an old pair of 3D ones from the bottom of the dressing up box. Now, strictly speaking Mr Twit doesn't wear glasses, but it seemed like a good way to keep the beard in place.
Worth trying it for size at this stage, before getting to work...

Angry little elf..
After painting it black, we scrunched up bits of black paper and stuck them on. Tissue paper would have been better, but I could only find brown, so we have a two-tone beard.


Next, the fun part - making lots of disgusting things to attach to Mr Twit's beard. In the book it says, '..there were always hundreds of bits of old breakfasts and lunches and suppers sticking to the hairs around his face'. And mentions stuff like scrambled eggs, tomato ketchup, minced chicken livers, a mouldy old cornflake and the slimy tail of a tinned sardine.  Mmmm, lovely..

Mr Twit's beard

Our sardine tail is card covered in tin foil, a big blob of paint for ketchup, broken crisps and cornflakes, little bits of old sponge for scrambled egg - and then we added our own things, like some spaghetti, baked beans cut out of foam stickers and little balls of green plasticine for peas.

'..because of all this, Mr Twit never went really hungry. By sticking out his tongue and curling it sideways to explore the hairy jungle around his mouth, he was always able to find a tasty morsel here and there to nibble on...'
Mr Twit's beard - world book day

Suitably yucky I hope!

Linking up with Red Ted Art's Kids Get Crafty