13.2.15

Cosy Valentine

At one of the craft fairs before Christmas, I spotted some cards with lovely little knitted festive finger puppets attached to the front, and thought what a great idea…being fond of teeny tiny things, as I am.  My mini knits and tinsy decorations tend to get lost amongst all the other stuff I sell, on my menagerie of a stall, so, I'm thinking, putting a few on cards might help get them noticed. Surely a card that doubles up as a gift has got to be a bit of a winner?


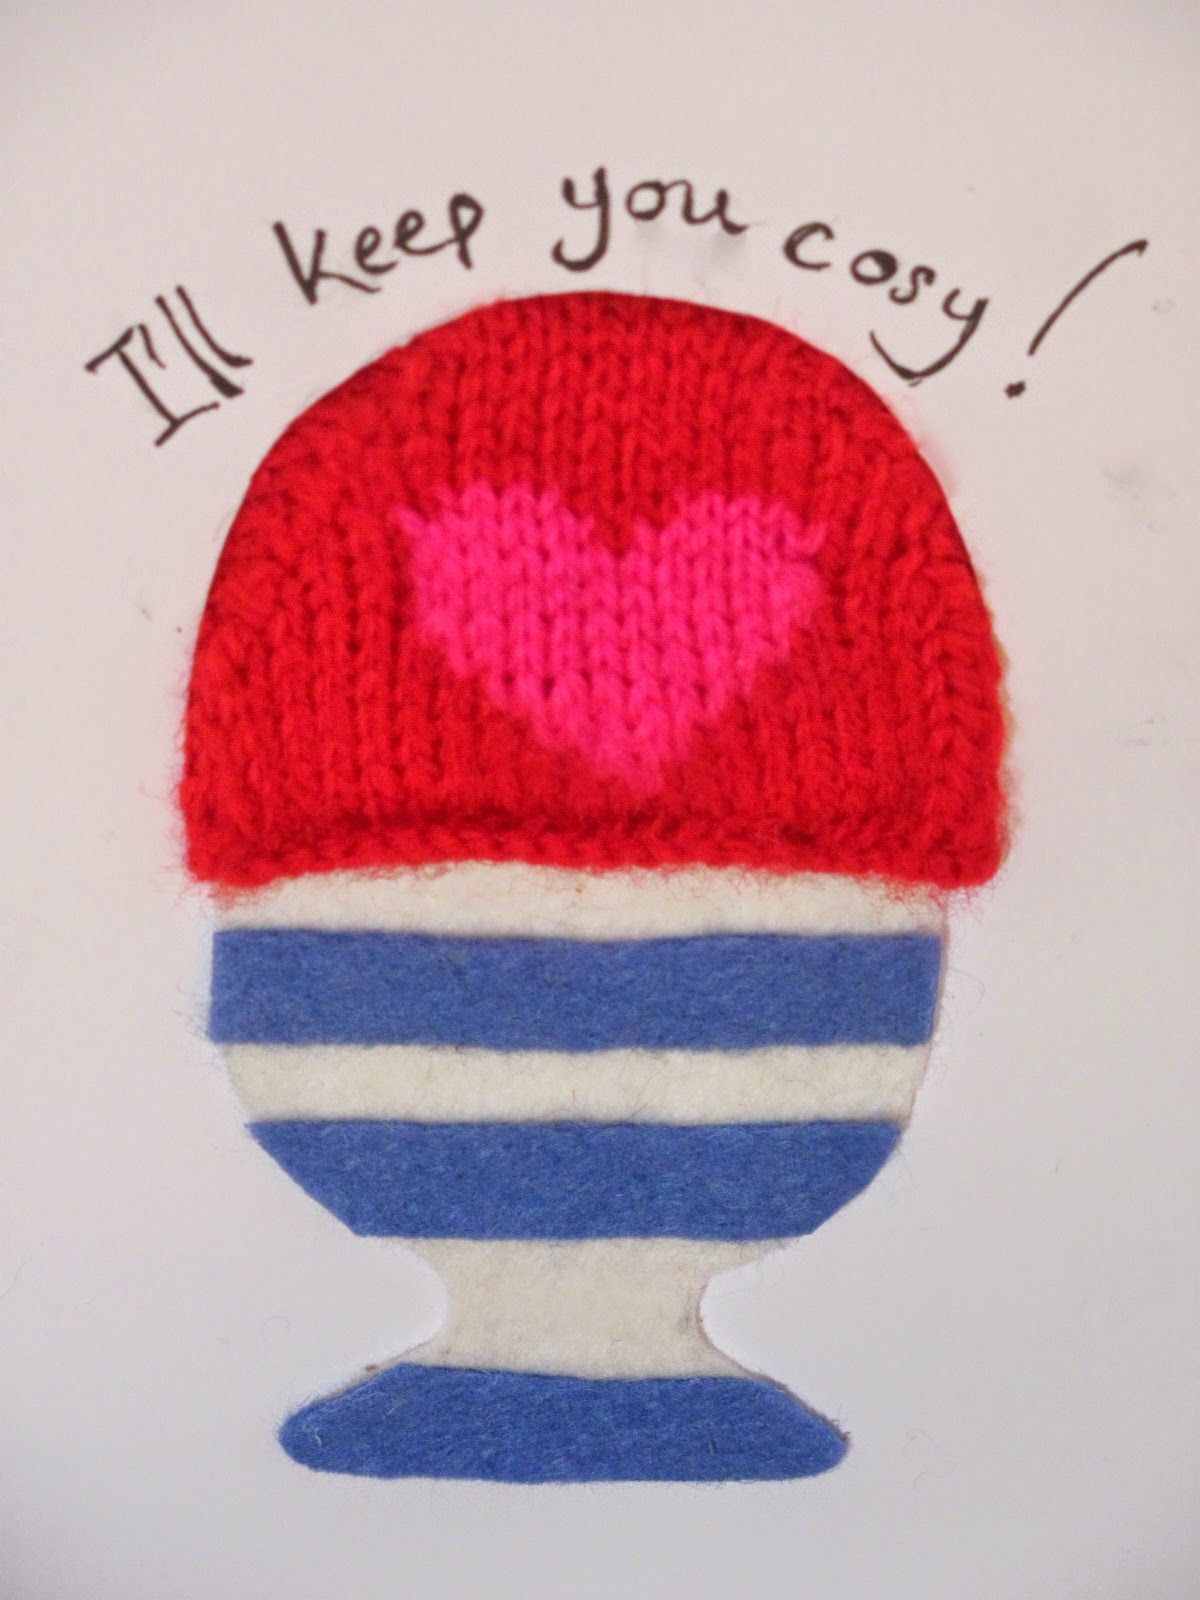
So, I'm trying it out on family first, and have come up with this Valentine's idea, that sort of works, I hope! No finger puppets though, wasted on my husband - I went for an egg cosy option. Not completely convinced anyone really uses egg cosies these days, still, I like making them. This one's rather gaudy, but clashing red and pink felt right for Valentine's Day.


For the card bit, I cut an egg cup shape out of felt, making sure it was as wide as the egg cosy opening, and glued it down - then drew an egg shape sitting in the cup, pierced the card and cut along this line, so the cosy could be pulled, snuggly, over the top. Needed just a few stitches behind to hold the cosy down.
Think I could do with working on my writing…a bit scruffy looking, and quite a few smudges that I've tried to magic away. But on the whole, I'm happy.

Maybe it would work for Easter cards too?


11.2.15

New chapter, new book

Sorry this is all a bit short on detail; there'll be more to tell soon I hope, but I have news! Well, sort of a headline without an actual story…. I'm in the throws of writing a craft book, which is massively exciting and terrifying, and when the time's right, I will fill in the gaps. When I'm allowed.

It's been full on - the blog's not the only thing that's been neglected - the house is a tip (not looking); the kids eat surrounded by mountains of cardboard and paint; my eldest's trouser hems are swinging way above his ankles, and there's admin stuff sitting by the toaster that's been gathering dust since Christmas.


But that's all okay (trousers have been ordered), because I'm being pushed and challenged, and I sort of remember thinking when I started this blog that that was what I wanted.
It's been scary though; such a steep learning curve, and my confidence comes and goes like shadows.

I agreed to pretty tight deadlines too, partly because I wanted to be seen to be keen, but also because I've only ever worked to deadlines. Thing is, when I worked as a tv reporter, I didn't have 3 kids and a husband who was only home at weekends. Know your limits…think I've found mine.

Anyway, I worked flat out and just managed to get everything ready for a recent photo shoot. It was an intense few days; challenging, interesting, exhausting, and a total and utter change - like stepping into someone else's life. It's weird only being responsible for yourself when you haven't done it for a while. Weird and lovely.

I stayed with an old school friend I don't see enough; the only downer was the daily commute - the misery of squeezing onto trains, pressed up against someone's armpit. I couldn't do that day in day out, not anymore. Too old for that malarky. Still, it did put the hellish school run in a better light.

We went out for a meal one night to a really hip club. It certainly felt pretty cool, but was so fashionably moody and dark, you couldn't actually see much. What's that all about? Am I showing my age again? Everything was a shade of brown, including the food. It was so murky, one friend walked straight past us and spent 10 minutes searching various rooms, even managing to stumble into Russell Brand in the dingy gloom. She said he looked scuzzy. Such a great word.

Our table was booked for 9.30. 9.30 on a Thursday night! Nothing much is open around me at 9.30 on a Thursday night. As far as I know anyway. I'm usually getting my knitting out around about then.

And now I'm back to the knitting, frosty school runs, grumpy kids, homework, mess, and thankfully the return of the glorious GB Sewing Bee. It's like I've never been away, except the book is happening. It really is.

28.12.14

'Present' Danger

I came across this when I was clearing out my half finished posts from ages back - a timely find really, but feel sort of mean, because I got brilliant Christmas presents this year... 


'Hope you like it!' he says and I smile politely,
(thinking that's going to be very unlikely),
and bless him, because I know he tries,
but when it comes to clothes they're never my size...
Jewellery's dodgy,
music's okay,
though I'm more Stereophonics
and he likes Doris Day.

I open my present. There's a torch inside.
'You just wind it with the handle.'
I almost cried
'So useful sweetheart, hope you like yours',
it's Rick Stein's India,
there's a pregnant pause...

'Wow…that looks just great…' He never cooks.
But he does like spice
and he does like books.

He starts fiddling with the torch and I flick through Rick Stein,
everyone's happy, it's all turned out fine.

So, I buy what I want, it's simply stress free
when a gift's from me
to you
to me.

23.10.14

Jumper upcycling…you might warm to...

I had this favourite cashmere jumper; it was a bit baggy and shapeless, but I loved it because it was a present from my husband before he went to Afghanistan the first time.

The jumper was the thing I'd reach for when the kids were finally in bed, and I had a bit of time on my own in front of the telly with my granny squares.
I think I wore it nearly every night for those 6 months. Funny how it became such a comfort, but it did. And it was a long six months.

Anyway, probably because I wore it endlessly, it started slowly falling apart - under the arms, then an elbow, then a random hole. Eventually I just left it in the drawer, until it was time for my old friend to become something else - and no, not a rabbit, though obviously that did cross my mind! No, I wanted to make the jumper into a useful thing, and so settled on a hot water bottle cover, because I  love a hottie; and the one I'd been using has a football on the front.
.
Hand up here, because I nicked this idea from a lovely friend who used to blog, and made one out of an old cashmere scarf she'd picked up in a charity shop. It was woven rather than knitted cashmere, and possibly easier to work with, but after a few hot washes my jumper shrank quite nicely to tiny, tight proportions. So small in fact, that I was worried there mightn't be enough jumper to make the cover! In the end I opened up the non-holey sleeve.


Then I just drew around the bottle on some newspaper, added a centimetre with a ruler at points round my drawing, and joined the dots. Once I'd cut it out, I folded it lengthways to make sure it was as symmetrical as possible, snipping off any extra bits.


I cut a whole one out from the sleeve, then used the ribbing at the bottom of the jumper to cut two overlapping pieces. The top section is just over a third of the bottle, the bottom piece makes up the rest + an extra 6cm for the overlap.


Then pinned it inside out, making sure when I turned it back the top section covered the bottom, rather than the other way round - I say that, because I often forget to check…
Didn't take long to sew round, and I'm by no means a ninja with a sewing machine. I added a zigzag row to neaten the seams and stop any fraying.

Finished off with two shell buttons that fasten with loops.


It's not perfect, a bit lumpy in places, but I'm really pleased with the end result, and a rather fitting, comfy reincarnation, don't you think?


Also, a pretty easy bit of upcycling, especially when you consider this one costs £109! £109!!

Worth digging out those old jumpers?

9.10.14

Hedwig owl costume

I was up really late last night finishing off, but it was worth it, because today I've been basking in the warm glow of being the best mummy Ever!

Obviously it won't last, so I'm enjoying the moment...


I'm not going to pretend the costume's quick to make, but it is straightforward, so if you're not in a rush and would like to have a go, here's a little run through.

You'll need an old sheet, a balloon, glue and lots of newspaper.

Cut a head-sized hole in the middle of the sheet and slip it on.
Get them to hold up their arms and cut to fit. You'll end up with a sort of circle. It doesn't matter if it looks a bit rough - all adds to the feathery effect!


I pinned and machined a row of stitches down each side, to give the wings more definition, but the costume would work just fine without this.


Zig-zag the wing edges, then make a paper template for the feathers, and cut plenty out of the remains of the sheet, plus any other fabric scraps you like. Quite time-consuming this part, but it makes a big difference I think. Once you've got a decent pile, start sticking them on the wings. We used ordinary PVA craft glue.

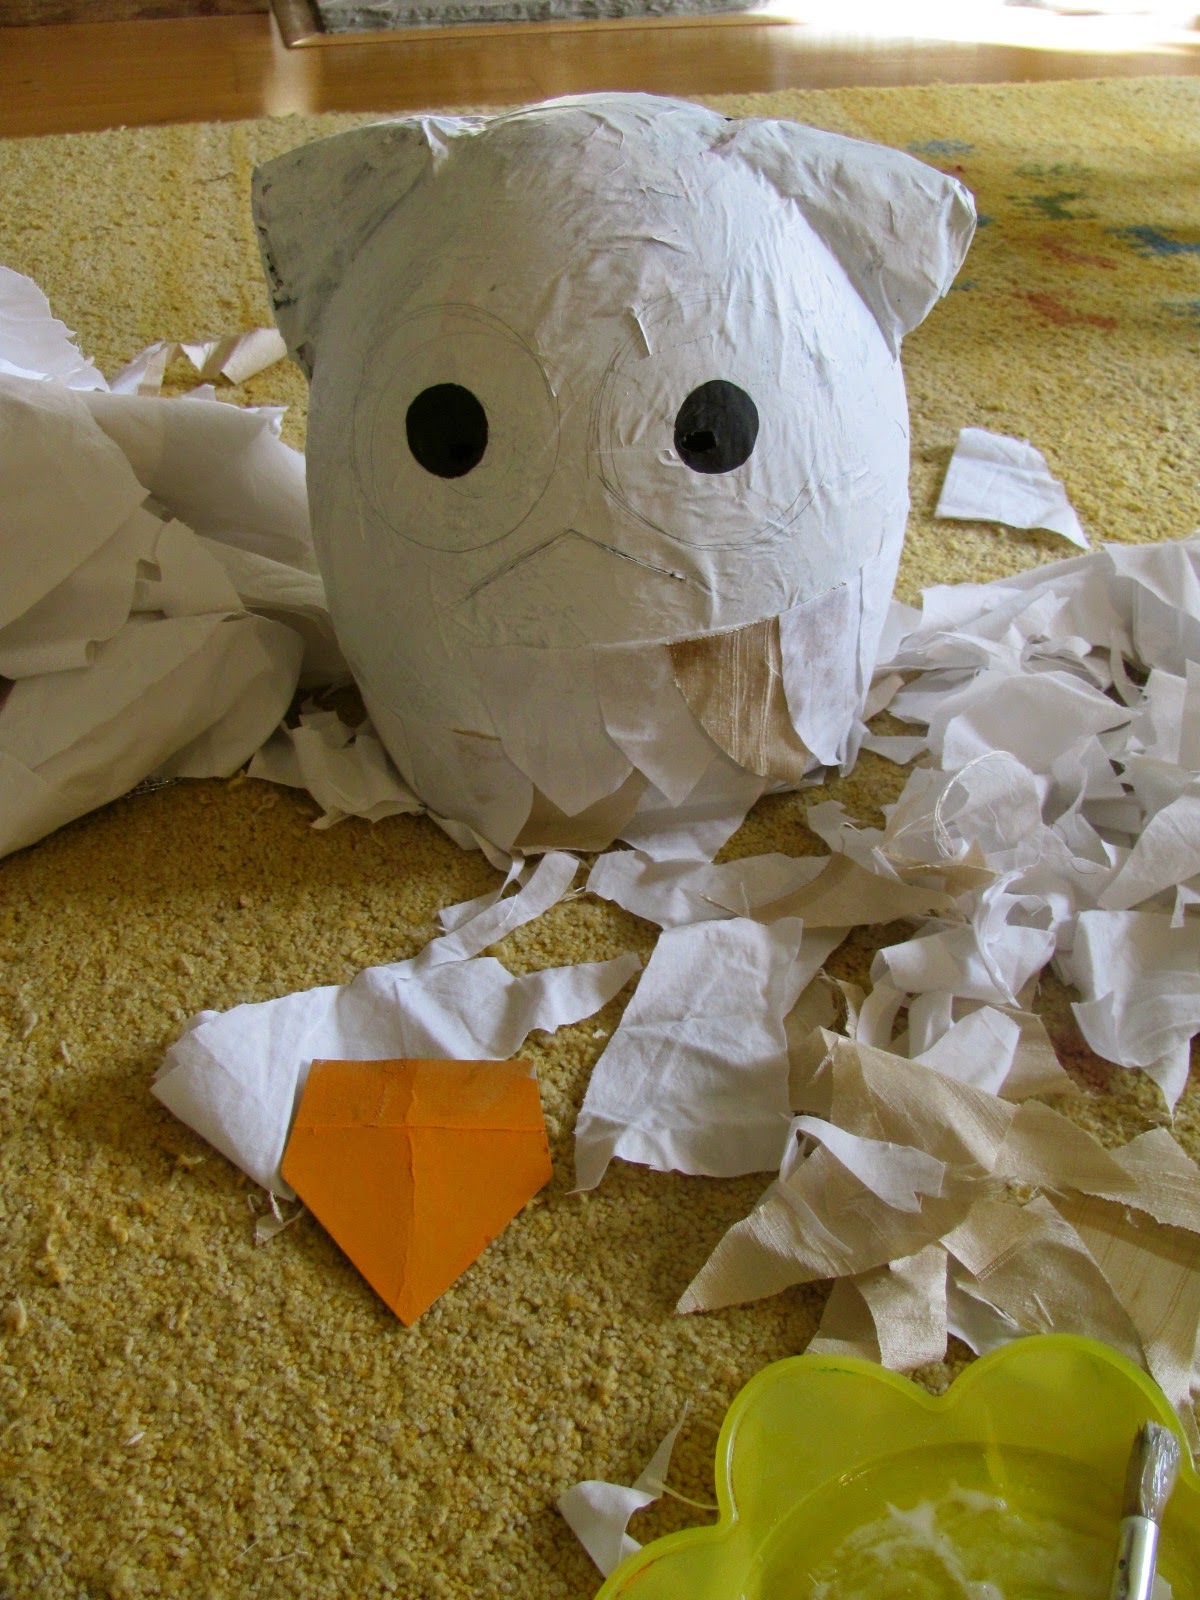
The head can take a while too, though this is the most fun part - certainly for the kids. Good old papier mache! Make sure the balloon is as big as possible and that you've torn up lots of newspaper, then get sticking with some runny glue (watered down PVA).
Use a brush to spread the glue all over the top of the newspaper pieces too, so they're nice and smooth. Check you've covered the whole balloon. The ears are scrunched up bits of newspaper, covered in more gluey paper.
For a sturdy head, best to let it dry between layers - this is when you need a bit of patience.
We did three layers altogether.


Paint it white, pop the balloon and cut the paper carefully at the bottom until it fits (a slit at the back helps)


Work out where the eye holes should be, then draw big owl eyes. Make a beak out of cereal box card, bend to give it a ridge down the middle - then, below the eyes, cut an upside down v, the same width as the beak. Feed it through the v, keeping it angled down. Sellotape in place inside. Make a mouth hole under the beak if you want.


Cut out smaller feather shaped pieces from the sheet and snip them in half. It looks good if the first row hangs over the edge a little, then just keep going round.


We cut a few little bits to go round the eyes, but it's totally up to you how much you decorate the mask.

Finally, tie some string through holes in an envelope addressed to Harry Potter.


I was kind of hoping to take another picture, but the snowy owl I picked up this afternoon was muddy and quite dishevelled with a few tomato ketchup splodges down the front….still, no matter, because Hedwig won a prize! Hallelujah!

She was so excited as we walked to the car.

'I'm not going to wear this again Mummy - next time I'm going to be something EVEN BETTER!'

Yeah....I know...

8.10.14

Giving a hoot about dressing-up days

I'd hazard a guess that for many parents, events like World Book Day are less about the joy of reading, and more about the angst of finding a 'favourite character' costume for the kids to wear to school. And preferably not Harry Potter or Hermione…though you can't knock the quick-delve-in-the-drawers-or-dressing-up-box option.
In my daughter's class last World Book Day there were nine Harry Potters and 4 Matildas (blue dress and a hair band) - I know this, because she was one of them.

On the whole, I tend to stubbornly steer clear of competitive dressing-up - apart from possibly Mr Twit's Beard a few years ago. I did get quite carried away with Mr Twit's Beard!


But then the other day, I got one of those forlorn looks from my daughter that just made me sort of crumple inside.
Her class had to dress up in something purple for a special party at her new school - I was chuffed to bits to find a purple cardy and a dress with purplish flowers.
She wasn't so chuffed…especially when she saw her friends glammed up in sparkly lycra, Strictly style. That's when I got the look.
The best dressed prize went to an impressive bunch of grapes.

BAsically I was shamed into action. So, when a letter came home about the school's book week with a dressing-up day thrown in for good measure, I thought I'd pull out all the stops.
By the way, don't be worrying you've inadvertently missed something: the official World Book Day isn't for months - this just seems to be a warm up!

Anyway, we settled on Hedwig, Harry Potter's snowy owl - somewhat random, and a rather liberal interpretation of the 'favourite character' theme, but it fitted with my 'make stuff for school rule', which is, only things I've already got at home are allowed. Definitely no buying.

I had a sheet, a balloon and plenty of newspaper.

The dressing-up day is tomorrow and I still haven't finished ….if it works out I'll post a pic!


26.6.14

Flamingos flock to the Zoo

I haven't rolled up to the zoo for a while, so, time I think for a bit of pink! Bring on the flamingos!


As well as an egg box, you'll need:
ice-cream carton lid
orange pipe cleaner (20cm/8" long)
2 pink feathers
green, yellow and blue paper (or plain paper to paint)
PVA craft glue
glue stick
sticky tape
pink paint (red and white)
craft scissors
nail scissors
small ball of plasticine
black felt tip pen

We had a bit of a pipe cleaner quandary, because (as we found out) flamingos have pink legs - but the pink pipe cleaner didn't look quite right with the pink paint we used, so we opted for orange instead.


1. Cut out an egg cup for the body and push the bottom of the cup up with your thumbs to make it more dome-shaped. Paint pink, plus both sides of part of the egg box lid, for the head and neck (pull off any label - doesn't need to be a big piece)

2. Draw your flamingo's head and neck - sort of like an S shape - wider and straighter where it joins the body (but make sure this bit is no bigger than the height of your egg cup body) and long enough here so there's enough to push through a slot. (See picture below)

3. Make this vertical slot in the middle of one side. Draw a pencil line where you want it - put a ball of plasticine behind, so there's something to push against.
Use the nail scissors to make a hole on the line (keep them closed, press down and twist slightly from side to side). Once you've made the hole cut along the line, making sure it's the right size for the bottom of the neck. Wiggle the scissors in and out of the slot to make it easier to push the neck into place.
Leave out for now though, while you finish the body.


4. Fold the pipe cleaner in half and attach under the egg cup body with sticky tape.

5. Glue on two feathers either side of the body, and draw eyes and a beak with a fine black pen before slotting the head back in.


6. For the watery setting, take some blue paper, draw around the lid, cut out, then press this bit of paper into the edges of the lid top, before cutting along your creased line (see first pic) - this helps get a good fit.

7. For younger makers or if you'd like to simplify your watery scene, glue the blue paper to the lid now and jump to step 11, OR, if you want more detail, leave the blue piece to one side and cut a sandy yellow piece to fit the lid in the same way as you've just done for the blue water. Glue the yellow piece in place on the lid (a glue stick is great for this)

8. About two thirds of the way along your blue piece, cut a wavy line. We drew around this wavy line on some pale blue paper (see second pic -white paper would be great too). Make a few waves if you like, about a cm or so wide. Or you could paint waves on instead.


9. Before sticking the water down, cut a 4cm (11/2in.) strip of green paper, long enough to go around one end of the lid. Draw a pencil line along the strip, about a cm from the bottom edge and fold along the line. Cut a zigzag fringe of grass along the wider top part, up to the fold. It looks good if the grass is uneven and different heights. Add a few yellow rush grass tops if you want, with snips of yellow paper or yellow paint.

10. Make a few snips below the fold, this will make it easier to press the grass around one end of the lid, especially in the corners (pic 4). Glue the grass in place then  glue the water and waves on top. Add a few cut out circles where you want your flamingo to stand, giving a kind of ripple effect. (Or paint them on)

11. Poke a hole through the middle of the ripple circles with the nail scissors (best done by an adult as the plastic is tough). Keep the hole small or your flamingo will wobble.

Bend the pipe cleaner over when you're happy with the leg length and sellotape underneath. Cut the other leg so it's a similar length and fold the very end of the sharp tip over. Strike a flamingo pose!


Many more projects like this in my craft books, 'Make Your Own Zoo' and 'Make Your Own Farm Animals'