17.6.15

Little egg box Clangers

Lovely to see them back! Hopefully the Clangers will be just as popular this time round, so old timers like me can wallow in a bit of nostalgic childrens' telly....

Clangers craft

To celebrate their return, we've been making mini ones from egg boxes (of course!) Their noses aren't quite as narrow and pointy as the real thing, but think there's enough of a likeness?
If you want to have a go, you will need:

An egg carton
red and white paint
fine black felt tip or gel pen
brown wool
glue
glitter
sequins
general purpose scissors
Straight-edged nail scissors (optional - adult supervision needed)

1 Roughly cut out the two middle cones from the egg box. This makes them easier to work with.


2 Take one, and just above any joins at the bottom, draw a line around the cone. Cut up and along the line. This will be the body.

3.For the legs, cut up the middle of one of the cone sides, about a third of the way. Then wiggle and turn your scissors to cut across to the corner, and just a little beyond. Do the other side too, so you've cut a sort of 'T' shape. Now repeat this 'T' shape on the opposite side of the cone.


4. To form the legs, the cut edges in the middle towards each other and squeeze each side into a rounded leg shape. If they're too big, snip off a small piece of card. There's no need to use glue. The legs should hold and the body should be stable. (Snip the bottom of the legs if the body is a little wobbly)


5. For the head, take the other egg box cone and use a pencil and ruler to mark about 2cm from the top on all sides. Join the marks with a line. Choose which side you'd like for the face and draw round Clanger ears on the corners, so part of the ear is on the adjacent side.


6. To help cut the head out, cut up the two back corners to the pencil line, fold the flap of card back and cut it off. It should now be easier to cut along the rest of the line, cutting carefully around the ears. With the little fiddly bit of card between the ears, either bend it forward and snip off or simply fold it behind.


7. Because the egg box cardboard is prone to ripping, you may need to snip into the bottom of the ears, before gently pushing them forward. Round off the pointy corner if you want to.

8. On the underside of the head, cut up the two back corners, almost to the end, bend back this flap of card and cut it off. Glue the head onto the body. Don't push it right down onto the cone. There should be a little gap at the back, between the top of the cone and the top of your Clanger's head.


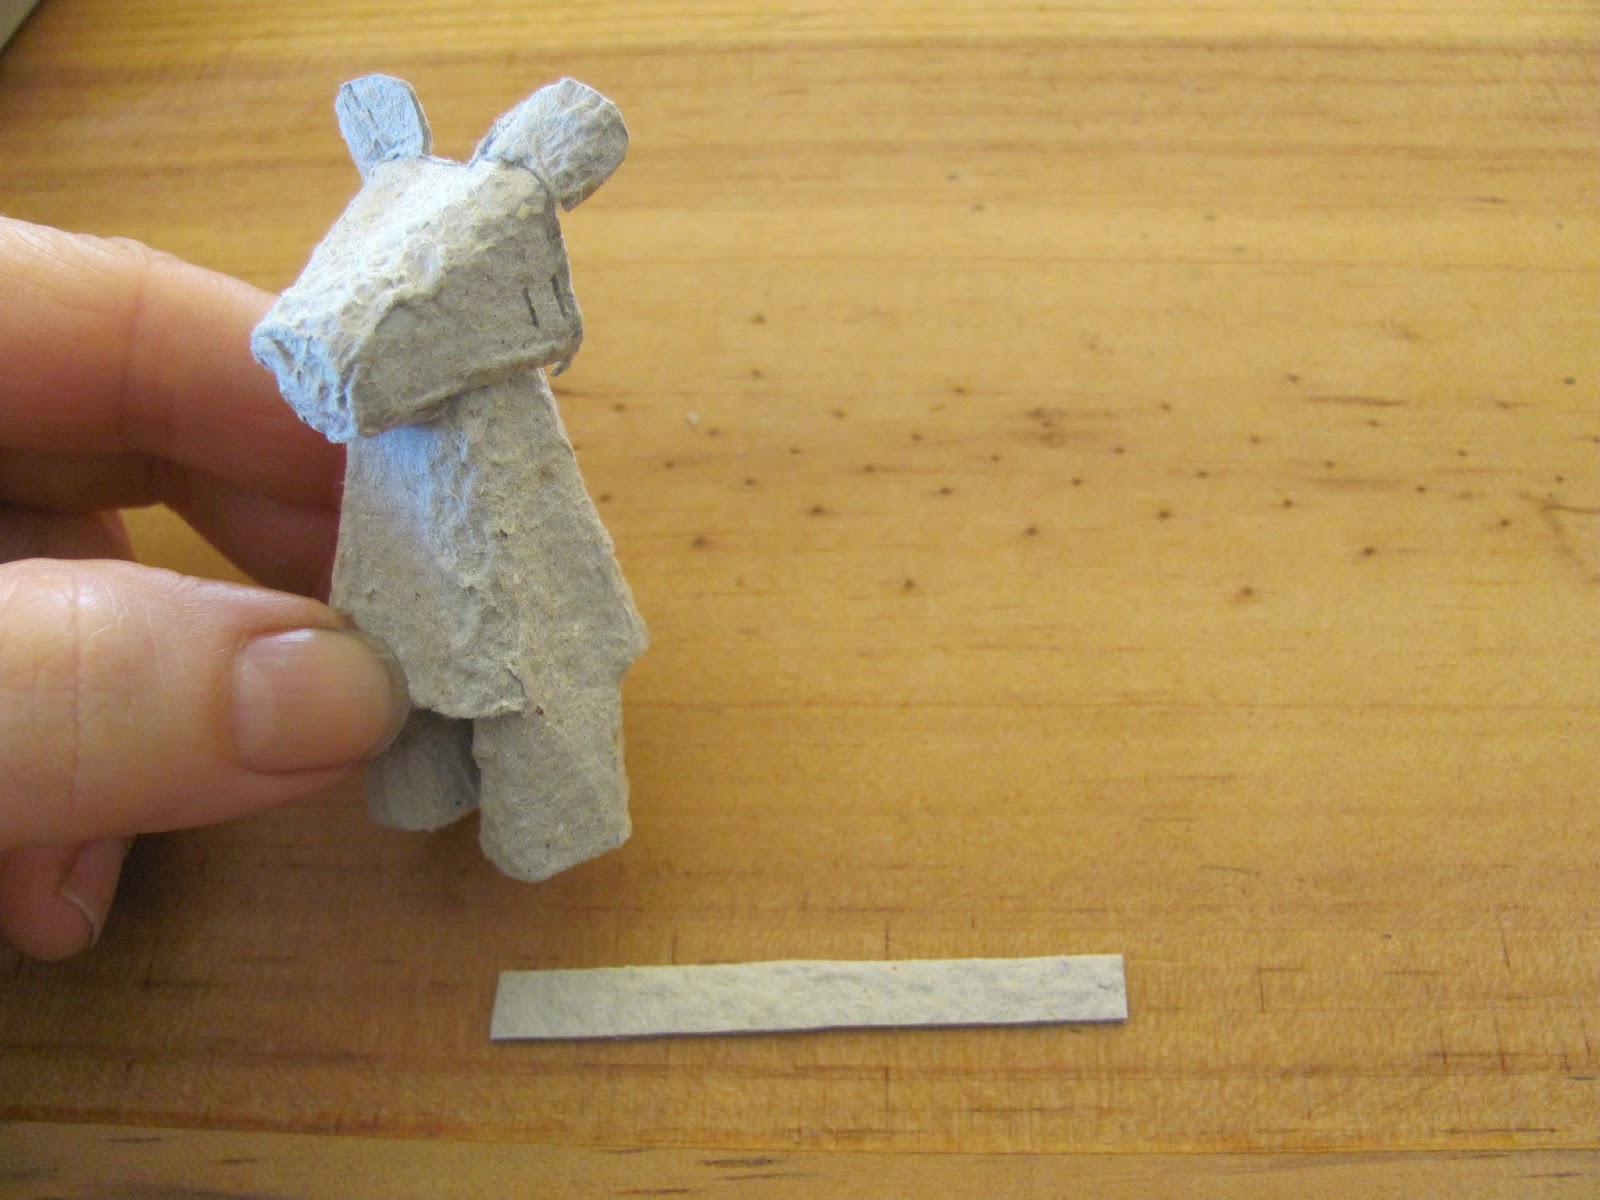
9. For the arms, cut a thin strip of card from the egg carton lid, about 5cm/2in. long.


10. Painting time - mix plenty of white and just a little red to get a nice pale pink colour and paint the whole of the body and head, as well as the arm strip.

11. When dry, fold the arm strip in half and cut along the crease. Use small scissors to snip long pointy fingers in the ends if you like.

Then, either glue the arms either side after you've finished decorating your Clanger, or, use the nail scissors to make slots either side (keep them closed, press down firmly and twist until the tip pierces through the card, then cut slots)

Wiggle the scissors in and out a few times so it's easier to push the arms in. Check they fit but then leave them out while you decorate your Clanger.

12. Two decorating options - either glue on sequins (we had some large ones which were perfect), or, cover the body with an even, thin layer of glue and sprinkle glitter! (Make sure you don't get glue on the head though!)


13. For the hair tuft, cut a little piece of wool, separate the strands and stick it down between the ears. Dot eyes on top near the ears with a fine black felt tip pen of gel pen and push the arms back in place or glue them on.


18. To add a bow, fold a small piece of paper over and draw half a small bow on the fold. Cut out, open up and glue in place.


For a star-gazing Clanger, don't cut the underside of the head and simply slip it over the top of the body instead.

Clangers craft


9.6.15

Make Your Own Zoo - My Book!

What a journey it's been! From those first few toilet paper tube lions, to now; an actual, real kids' craft book, packed full of cardboard creatures. Make Your Own Zoo is out on the 13th August.

kids craft book

Who'd have thought it.

Certainly not me 3 years ago, when I started plundering the recycling pile to make animals with the youngest. My husband had gone to Afghanistan for a year, I'd started blogging to give me a focus away from the endless routine; and making a menagerie of creatures to share online just sort of happened.


My daughter began putting in requests - for giraffes, elephants, hippos - then monkeys and flamingos, and it was a challenge, but I loved it. Slowly our zoo grew, and so did an idea.....

What about a book?

I've plenty of kids' craft books, there are hoards of brilliant ones out there, but not many, as far as I'm aware have a theme like a zoo. In my experience children like going with a theme and adding to a scene they can eventually play with. I've found it helps catch their imagination and their attention, which, quite frankly is key to crafting with kids because they get bored pretty quickly.

Well mine do, I've heard the sighs and seen the rolling of eyes when the cardboard and glue come out, but making the animals together was fun, it felt as if we were going somewhere. And because she was interested, my daughter came up with her own ideas, like making a turtle with a retractable head and putting the flamingo in an ice-cream lid pond.


The zoo also shows the enormous potential of everyday cardboard packaging - tubes, egg boxes, cereal boxes - stuff we all have that usually ends up in the recycling bin.

The fact you can make a whole zoo from these ordinary things has got to be appealing?

And, thankfully, it was. The lovely team at CICO Books took me on, and I embarked on one of the steepest learning curves of my life. Apart from having kids.

Truthfully none of this would have happened without the blog. It helped give me the push I needed to try new things and, importantly, see them through. It also gave me the confidence to take the next step, because I could see people were picking up my animals on sites like Pinterest and Facebook.

I had about 14 projects on the blog before I got the deal with CICO - and there are over 35 in the book, plus short, silly poems for each animal. I've been busy! All the original step-by-steps have been updated, and I've added birds, sea life, enclosures, trees and scenery. Even an aviary and an aquarium. I'm so pleased with how they've turned out.


All the elements are there to make a scene, large or small, whether it's a big game zoo, or penguins and seals in a water park, or your own monkey world.
Wherever your imagination takes you.


The book is packed full of pictures and easy to follow step-by-steps. There's plenty of scissor practice, sometimes a little challenging, so it's best for school age kids with adult help. Parents are always going to be the best judge of how much or low little cutting to let their kids do, but I've found the more you let them loose, the better they get. Some of the bits I thought my daughter would find hard, like making holes and cutting slots, were actually her favourite, once she'd got the hang of them.

I think one important thing I'd like to get across is, whatever you make will be your own unique creation. Working with recycling cardboard is not an exact science - packaging varies; sometimes a little, sometimes a lot. Trust me, I know! So, this kind of crafting is about making the most of what you've got, adjusting and tinkering if you have to. Lots of room for artistic licence! Don't worry if they don't look exactly like the pictures; different is good - they are your animals with their own personalities.

And I'd love to see them! I've started a Facebook page called Make Your Own Zoo where I'll share ideas, and hope eventually people will post pictures of creatures they've made from the book or the blog.

That would be fantastic.


3.6.15

A Favourite Place


I've done a lot of wandering up and down this beach. It's near Tyrella by the Mountains of Mourne in Northern Ireland, and we spent all the childhood summers I can remember, in a small cottage a stone's throw from here.

I don't know how we all managed to squeeze in; often there'd be the six of us, plus cousins and Granny, but you don't think about things like that when you're small do you; it's just the way it was.

What I remember is the mismatched china; lucky bags; ulster fries; an army of earwigs in my felt tip case and swing-ball battles. And just lying on the big bed in the main room, colouring in with my sisters, while mum cooked over the fire beside us in large blackened pans. Life at the cottage was pretty close to camping. There was no electricity and we drew water from a deep well in the garden. Best of all the chemical loo was in a marvellous old sentry box with a sea view my Grandad had picked up in a salvage yard. There were two other tiny rooms off the main one and mum had quite ingeniously managed to shoe-horn in three, three tiered bunks she bought when Armagh prison closed down and all the contents were sold off.

So we slept on our prison beds in sleeping bags full of sand, with a night light flickering beside us. The stuff childhood memories are made of.

Back to the beach and the reason for all the walking, because on the whole kids don't tend to be the keenest walkers, and I was no exception, but the thing is I loved hunting for shells. I'd spend hours wandering slowly along the tidelines, collecting any that caught my eye. The prize finds were always cowries and pelican's feet because there weren't so many, and I did become annoyingly good at finding them.

No surprise then that my daughter has caught the shell-seeking bug...with a gentle push from me obviously, and on a trip to Tyrella a while ago the two of us wandered up the beach together and collected a bucketful of shells. We used them to make mice and pram ladies - I remember doing this with Mum, right down to brushing on a shiny coat of clear nail varnish.


I'm fond of this picture with the sea mist softening lines and colours - she almost looks like she's floating. It was strange old weather, with blustery showers, heavy skies, sun and mist, though not so unusual for a beach day in Northern Ireland...


Funny, I don't really remember it raining during those summers by the sea.


Many more favourite places to peruse over at Tara's Photo Gallery.

11.5.15

Savoury cheese muffins with wild garlic and fennel

Love the idea of heading out for a walk in the countryside and finding fresh wild food, but my foraging skills are limited to the blatantly obvious - things like blackberries, wild strawberries, elderflower, rosehips - ones where there's no speck of doubt! Going on a course would help, and I've talked about doing that for ages, but it always slips off the 'would be good to do' list.
We found a puffball mushroom the size of a football a while a go, and even though it really couldn't be mistaken for anything else, there was still this slight niggle about actually cooking and eating it. Silly really because it was delicious. And lasted for days.


Wild garlic is good foraging fodder at the moment, and luckily we have quite a few patches around the garden. The foliage isn't unlike a lot of other healthy green, shiny weeds growing like triffids at the moment, but crush a leaf between your fingers and there's no mistaking that pungent smell. The raw leaves have a strong, fiery taste, though really come into their own when cooked. Even more delicate than garlic, a bit like chives, and a lovely alternative to spinach wilted in some olive oil or butter.


Best picked April/May time, before there are too many star-like white flowers, when the leaves can get tough and bitter - you can eat the flowers too though. Probably coming toward the end of the season now, but the leaves still taste good to me. Wild garlic is usually found in woodland among the bluebells, or in marshy, damp places.
Says a lot about our garden...


It doesn't take long to pick, my daughter knows the best spots now, and you don't need much anyway. Often chop up a few leaves and add them to pasta sauce or risotto, but the thing everyone seems to like the best are these wild garlic, cheese and fennel muffins. They're a savoury-loving lot my kids.


280g of wholemeal or plain flour
3 teaspoons of baking powder
2 tablespoons of sugar
75g of grated cheddar + 25g grated parmesan (or 100g of whatever cheese you have in the fridge)
10 wild garlic leaves finely chopped
1 teaspoon of fennel seeds
1 egg
100ml plain yogurt and 200ml of milk (or 300ml of milk)
90 ml of vegetable oil
Makes about 10 muffins
190-200 degrees C, Gas Mark 5-6

Put the cases in the muffin tin - they tend to stick to the cases more than sweet ones, so if you prefer, do away with them and lightly oil the tin instead.

Add the flour, baking powder and sugar to a large bowl and stir in most of the grated cheese. Leave a little to sprinkle on top of the muffins.

In a measuring jug dollop in the yogurt, top up to 300ml with the milk, and then pour in 90ml of vegetable oil. Crack the egg into this liquidy concoction and beat with a fork.


Pour the wet ingredients into the dry, add the chopped wild garlic and the fennel seeds and mix together. Don't over-stir though. The mixture will be quite sloppy.

Spoon into the cases and sprinkle on the leftover cheese.


Bake for 20-25 minutes until the tops are golden brow and spring back when pressed gently.


Best served fresh and warm - though not at all bad reheated with a little spread of butter...


18.4.15

Paper primrose posy

There was a steep, grassy bank near our house when I was little. It was a great thinking spot - sitting up high, looking out over the garden, and in early Spring it was covered in primroses - a soft, delicate blanket of yellow. Anytime I see them now it takes me right back. So, these paper primroses are a nod to my wildflower bank, where I got lost in big, happy dreams.


They’re based on the paper daisy folding technique - though a little different because the petals are sort of heart shaped.

You will need:
yellow and green paper or plain paper to paint
sheet of newspaper
small plastic flower pot or yogurt pot
yellow and orange paint
PVA craft glue
Two small bottles or pots, for circle templates. One a little bigger than the other (for leaves).


If you have a small plastic flower pot, then that’s perfect - we didn’t, so I rubbed some sandpaper over a yogurt pot to take the sheen off, and painted it with multi-surface primer the night before. 

Make up some terracotta coloured paint using ready-mixed poster or acrylic paints. 

Mix red and yellow together and add just a little blue - then a good amount of white until you’re happy with the colour. I find adding white helps cover shiny, awkward surfaces like this - it works a treat on the outside of cereal box card too.


While the paint is drying, draw round the smaller circle template (we used a spice jar) for your primrose, and cut it out.

Fold the circle in half, then half again.


Draw a straight line up from the tip to the top, and make a mark halfway along the line.
Draw another line passing through this point from side to side, making a cross.


Then draw the rounded top part of a petal, from the point where the lines cross, curved up to the top and back down to the end of the line on both sides (like the top of a heart).  Keep them even.

Carefully cut round the petal tips with small scissors and when you’re happy, open up your primrose.

To make the flower centre, put a small dab of orange in the middle, and two short, thick strokes of yellow, touching the orange, under it.
Fold the flower in half, gently pressing the sides together.

Open, then put two tiny dabs of orange below the yellow and fold and press again. They’ll all have their own look which is perfect.


To make the leaves, draw round your larger circle template and cut it out.

Fold this in half, then half again.

About a cm up from the tip, draw a line straight across and mark a halfway point.

Draw a curved half leaf shape from this point to a top corner and repeat on the other side, so both look alike.

Cut carefully around the leaf tops and open up.


Put a dab of glue on the back of a flower and stick it onto a leaf. Make about 10 or 12.


Scrunch up the sheet of newspaper and stick it into the flower or yogurt pot, making sure a decent amount of it sits proud in a good mound shape.


Glue on your primroses


and overlap them, as that’s the way they like to be - bunched up close together.