It's been a long time since I shared any new Make Your Own Zoo projects here, but now the book's out, I really wanted to show you these - simple, colourful flying parrots.


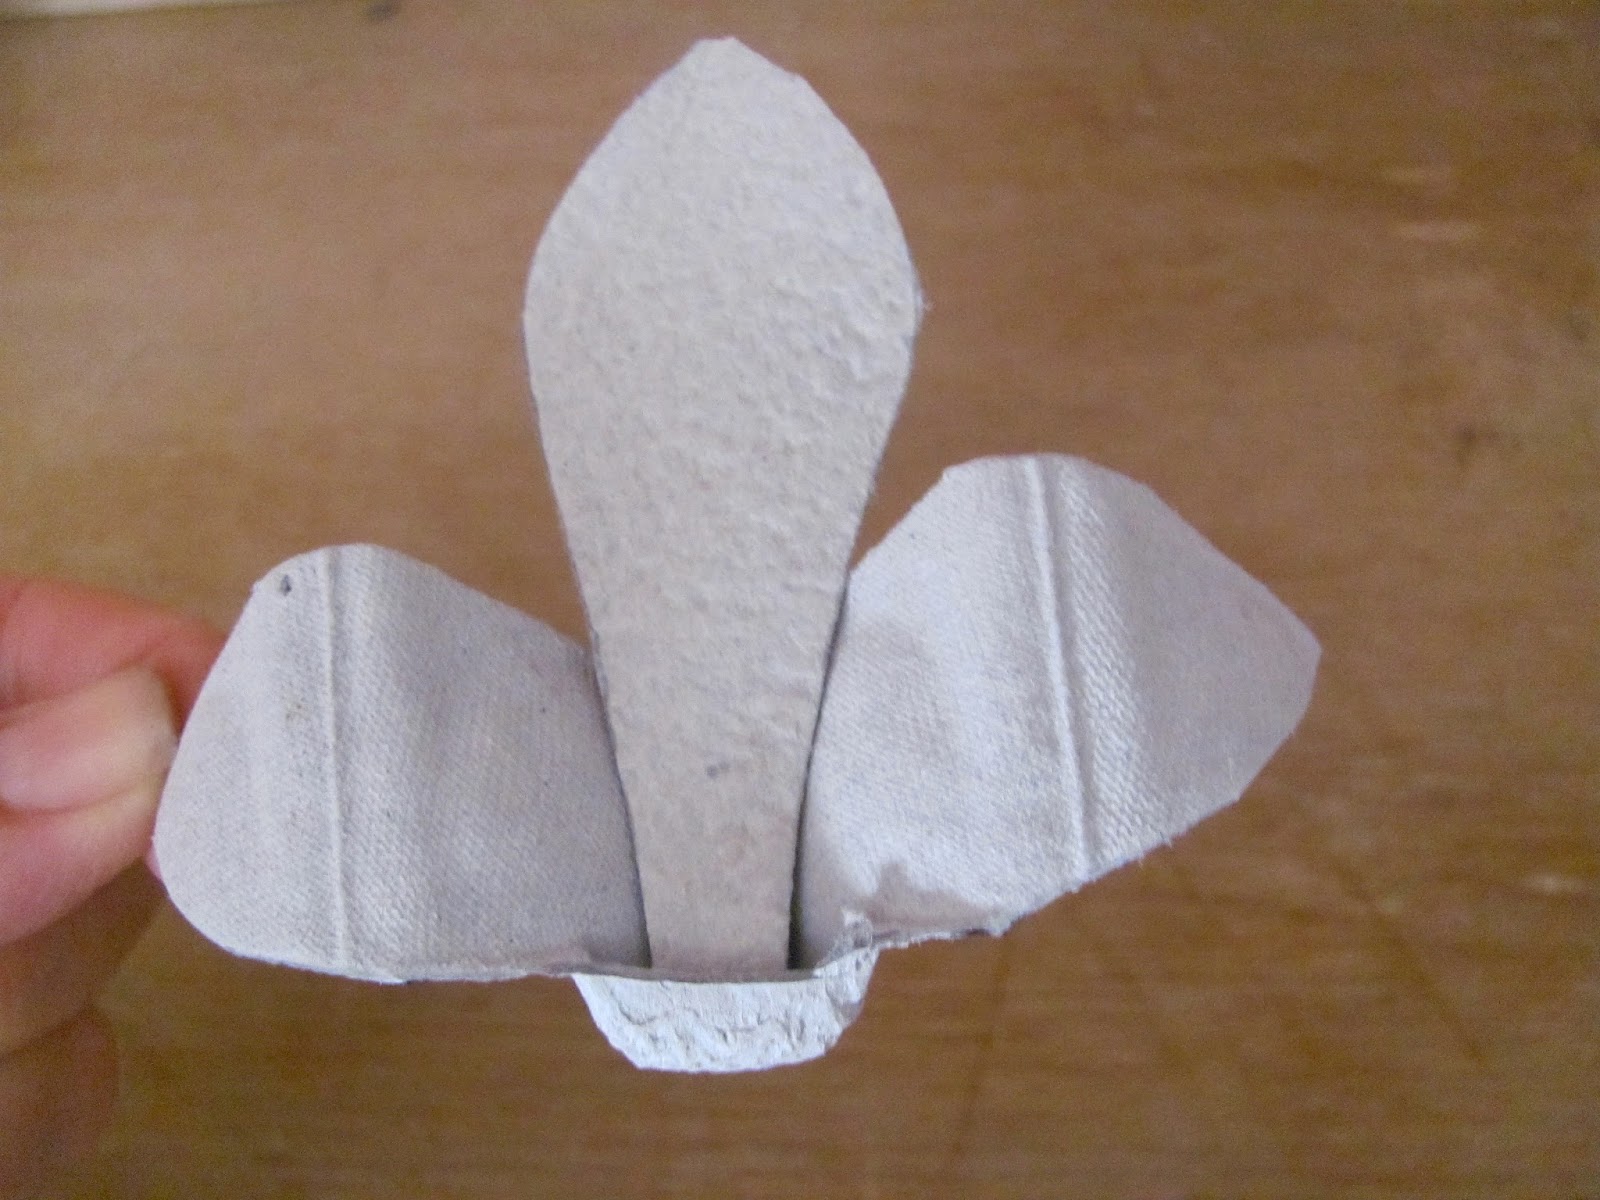
When you spend a silly amount of time looking at egg boxes, you start seeing things.... these birds are made from the piece between the egg cups - have a look:


...there’s the moulded part in the middle for the body, and the curve of the egg cups either side for the wings.


...there’s the moulded part in the middle for the body, and the curve of the egg cups either side for the wings.
And the best part is, if you turn it upside down, you have another flying bird shape - this time with wings down.


So, all you need is:
egg boxes
PVA craft glue
paint
general purpose scissors
straight-edged nail scissors
(all cutting should be supervised)
paper clip
needle
thread (about 50cm)
black felt tip pen
1. Start by drawing the bird shape in the box (see above), so you get the wings looking even, and make them as full as you can - draw right to the bottom of the egg cups. I’ve used a black marker to make the shape nice and clear - better though to use a pencil.
2. Cut out roughly first, then neaten up around the edges. Small scissors are great for this.
Decide whether you want wings up or down.
3. We made two different tail feather shapes and cut them out of the egg box lid.

2. Cut out roughly first, then neaten up around the edges. Small scissors are great for this.
 |
| wings up |
 |
| wings down |
 |
| wings up |
 |
| wings down |

The top of the tail feather piece needs to fill the groove, right up to the head, giving your bird a better body shape.
 |
4. Before gluing in place, you might want to snip out some long zigzags, to make it look more feathery. You can do the same to the wings too.

|
| wings down |
 |
| wings up |
With the 'wings up' bird, push the tail feather piece into the groove where it joins the wings. If you need to, use a paper clip to hold in place while it dries. We couldn’t find a paper clip, so used a clothes peg...
6. Painting time! Have fun with lots of bright colours. |
| wings up |
Don’t forget to paint underneath too.

Paint the face a light colour so you will be able to see the eyes and beak.

7. While the paint’s drying, make beaks. Cut a thin strip of cereal box card (about 5mm wide) and colour both sides black (a sharpie or something similar is good for this).

8. Round off one corner like so, for a hooked beak shape, and snip no more than 1cm from the strip. Make as many as you need.

9. When your parrots are dry, use the nail scissors to make a vertical slot for the beak (keep the scissors closed, press down and twist slightly from side to side - don’t push too hard!)

Snip the slot to make it the right size for the beak. Brush a little glue on the end of the tab (or behind the head if there’s room) and push the beak into place. Dot on eyes with the black pen.

Snip the slot to make it the right size for the beak. Brush a little glue on the end of the tab (or behind the head if there’s room) and push the beak into place. Dot on eyes with the black pen.


TIP: For a quicker, easier option, just draw on a beak with the black pen and dot eyes either side.
10. Thread a needle, tie a good knot in the end and push it up through the middle of your bird, from underneath (probably best done by an adult). Don’t worry if it tilts up or down (it most likely will) as this adds to the flying effect!
Put a dab of glue on the knot, to help it hold.
One tip to get a 'wings up' bird flying straight, is to find a mid-point where it balances on the end of the needle - easier than it sounds, honest! Press the needle in, just a little, underneath - try different spots until the bird balances.


Put a dab of glue on the knot, to help it hold.
One tip to get a 'wings up' bird flying straight, is to find a mid-point where it balances on the end of the needle - easier than it sounds, honest! Press the needle in, just a little, underneath - try different spots until the bird balances.


EXTRA STEP FOR WINGS DOWN BIRD
You may notice some of our wings down parrots have their claws showing, as if they’re coming into land. To do this, keep an extra bit of the join with the middle cone when you’re cutting out the basic shape, like so. Trim and paint.


In the book there’s an Aviary you can make for your flying birds, but they also look good as hanging decorations - or what about a string of flying parrots?


Or maybe a mobile?


Many more projects like this in my craft books, 'Make Your Own Zoo' and 'Make Your Own Farm Animals'