13.3.16

Photo shoot - Sunday photo


Just back from a busy two day photo shoot for the animal board books and next craft book. Not as glamorous as it might sound, but unquestionably more interesting than my usual Thursday/Friday routine! We were in a basement studio somewhere in east London; facing a small but significant cardboard mountain of stuff to do.

I spent all day on my feet, or leaning over a table, holding my breath while I moved animals and tiny flowers/butterflies/snakes into place. Knocked the trees over a few times and the whole lot went like dominos which wasn't at all funny... Heaps of patience required. And my back's in bits.

I've spent a daft number of hours over the last month, making all the teeny finishing touches, like squirrels, rabbits, daisies, patchwork hills.
Many, many things.
Hope they'll make a difference.

Walking and tubing it back to Paddington on a Friday evening with a collection of shoe boxes, and a large art folder was a nightmare. So, so relieved to get to the station; felt like punching the air. But that good feeling didn't last long. The train was heaving. Ended up standing all the way to Bristol Parkway because I hadn't reserved a ticket.
Won't be doing that again.

Linking up with My Sunday Photo at Photalife.

3.3.16

Easy Easter Bunny - Easter crafts


These make really fun table settings/decorations for Easter day, as they're a perfect size for hiding a chocolate egg or two!

You'll need:
2 cardboard tubes - preferably different widths (we used a kitchen paper roll and a toilet paper tube)
A piece of coloured paper and paint to match
cotton wool ball
scissors
PVA/craft glue
black felt tip pen.

1. For the bunny's body, cut a 7cm piece from the wider tube, and a 5cm piece from the narrower one for the head. The quickest and easiest way to do this is to mark your measurement on the tube, squeeze the sides together just under the mark, and cut straight across the tube.
Paint them your chosen colour.


2. Cut a 6cmx12cm piece of coloured paper and fold it in half, lengthways.


3. About a quarter of the way up, on the folded edge, draw a short line across (no more than a cm) and then draw a rabbit's ear, using all the paper space available, right up to the top. Try to make both sides look as even as possible.


4. Cut out and open up.


5. For the front paws, cut another piece of paper - 4cmx10cm this time, and fold in half lengthways again.

6. At the top of one end, draw a rounded paw. Cut out and open up.


7. Glue the bottom part of the ears to the head, then glue this to the body.


8. Brush glue on the other piece of paper, except for the paws, and stick to the bottom of your bunny so you can see the paws at the front. This helps hold the bunny together. Glue on a small piece of cotton wool for the fluffy tail.


9. When dry, draw a face with the black felt tip pen and add chocolate!


18.2.16

Exciting news!

I'm knee deep in egg boxes, tubes and cereal boxes again. Happily wallowing in cardboard, making animals and scenery for a few new book projects.

Still can't quite believe that my hobby has somehow turned into a job. I've been very lucky, I know - but there's more to it than that, because escaping into a world of cardboard has helped keep me sane over the past 8 months. And I really do mean it - I've struggled with my husband being away this time. Kind of knew it was going to be one Tour too many. He has spent almost 2 and a half of the last 6 years in Afghanistan. It's taken its toll on both of us - but that's a post for another day, when he's home; when he's never, ever going away again.

Better at the moment to focus on good, happy things - where the cardboard comes in! I'm working on another themed craft book which is massively exciting. Wouldn't take a huge leap of imagination to work out what the theme is, but here's a clue anyway...


And I'm also making new creatures and settings for a series of board books for little ones - counting, noises, that sort of thing. So pleased the animals are getting books of their own!


It is pretty time-consuming for sure, but I want the scenes to look as perfect as possible, with plenty going on. I've just finished making a cave out of a large yogurt pot and a fair amount of newspaper...

The plan is to get all the board book makes done, plus the start of the craft book, for a photo session early to mid March, so I need to get my skates on. This is all still pretty new to me, but I enjoyed the photography stage last time - it was intense, but most of the hard grind is behind you by then.
In theory.

I thought maybe I'd write a little about my experience of the whole book process. I've talked about the beginning and the end, but not really so much about the middle.
Possibly because for a while I think I blanked it from my mind...

From the contract being signed to the last proof check took about 5 months. The first scheduled thing I had to do was send in scripts for the step-by-steps by set dates. This started off okay, because some of the animals I'd made and written up ages ago. But there were 35 projects to send in - I'd worked on a few new ideas over the summer holidays - still, there was definitely a 'seat of my pants' feeling by the end of the second month.

The first photo session was for the front cover and two step-by-step projects. I remember feeling so nervous, because this was all my stuff; people were looking to me to check if things were set out right, angled right, clear enough for the instructions. I realised pretty quickly I had to somehow look and sound confident, even if I didn't really feel it inside. Way out of my comfort zone, but I came home buzzing. Such a great feeling.

Didn't last that long though, because it soon began to dawn on me just how much there was to do. We'd only shot two projects. There were another 33 to go. I had plenty of animals but no other steps made up. This was my biggest mistake. One never to be repeated. I spent weeks and weeks working all the hours possible, to make up the various steps for all the other animals and scenery. Don't think I fully appreciated how long this would take me. For each project I was essentially making whatever it happened to be, at least 3 times. Definitely sapped all the joy out of it. This time I'm making up the steps as I go along. Lesson learnt.

The other downside of my cramming approach was that I started changing some of the instructions as I found better or easier ways to make up the animals. This is what happens when you develop an idea and make it for the 100th blinking time. There were a few other changes during the photo sessions too - so by the time I saw the first draft it needed a lot of corrections.
I spent a very fraught week in Costa's in Monmouth.

Just going back to the final photo session quickly - it was a non-stop three day marathon. But all the extra work I'd done on the steps did help speed things up, and the photographer was so experienced at close-up shoots, cracking on at a racy pace. There was a hand model too, which was such a relief because my hands are horrible! She was absolutely lovely and a really talented artist, which helped with all the painting stages.


Brings back lots of memories thinking about it all again. If I'd been asked back then about doing another book, I'd have had to take a few deep breaths before answering. But time has turned down the volume on the more tricky stages, and now I'm really, positively looking forward to the next challenge. It's going to be different this time. Yes?

Meanwhile  I'm busy making, trying to stay ahead of the game. With the odd detour...

Star Wars meets the little Red Tractor...

29.1.16

Easter egg carton birds in a tree


This cardboard Easter Tree is simple to make, looks sweet, holds sweets, and can be played with too, so, hopefully the kids will like it!

15.1.16

More things to make with old cards - 3D heart bunting

So there were still quite a few cards left after making the Very Hungry Caterpillar, and with Valentine's Day around the corner we decided to go with hearts.


I made this collage from cut up cards a few years ago, and though I was pretty happy with how it turned out, it was faffy and took forEVER....


These 3D card hearts are a lot easier!


1. First, fold a piece of plain paper and draw half a heart on the fold. Make your heart any size you like. We wanted to be able to get a couple from one picture, so ours aren't too big (8cm).


Open up and carefully draw round the heart on the back of a card. Cut out and use this heart as a template for the others.


2. For each 3D heart you'll need four cut outs, paired up (we went for matching designs and similar colours).


3. Glue the backs of the paired hearts together - match the dip at the top when you're gluing them.


The hearts will probably pop away from each other, so, put a book or a bread board on top to weigh down and keep them flat while they dry.

4. When they're dry, trim away any obvious sticky out bits around the edges.

5. Cut halfway down a heart from the dip at the top, and halfway up the matching one from the bottom tip. It's important to snip away a extra sliver from these slots to widen them, so the hearts slot together without buckling. If they still buckle and don't sit properly, trim a little more from the slots, but not too much; don't want your heart falling apart...


6. Decide what you want to hang your hearts on - ribbons, string, yarn - we used some leftover silver Christmas ribbon - decide on the length too, and tie it, stretched out, between two chairs.

7. Un-slot a 3D heart and work on the part with the slot at the bottom. Thread a needle and make a hole under the dip at the top.


8. Tie the heart onto the ribbon, when you're happy with the height, tie a double knot, then wrap one end of the thread around the ribbon again and tie another tight double knot to hold it in place.


9. Repeat along the length of the ribbon, keeping them evenly spaced. We arranged ours at different heights, in a sort of higgledy piggledy fashion.


If bunting is more hearts than you can handle, you could always make single hanging heart decorations. A handy little gift idea?


Linking up with Coombe Mill's Trash2Treasure


7.1.16

Things to make with old Christmas cards - The Very Hungry Caterpillar

Seems a shame to chuck out all those bright, cheery, sparkly Christmas and Birthday cards, which is probably why I have an overflowing box full of them!
So, if you still haven't got around to recycling yours, or you've been hoarding them like me (because you just never know...), then what about a Very Hungry Caterpillar?

Very Hungry Caterpillar made from old Christmas cards

You'll need:
A selection of old cards (Christmas and Birthday)
PVA/craft glue (leave some in a cleaned out jar or yogurt pot over night if you can, so it thickens up)
Scissors
Paper and felt tip pens (optional)
Sticky tape

1. First, sort through your cards and make a pile of the ones with blue or green tones - even just part of the picture is fine. The body pieces aren't going to be too big.


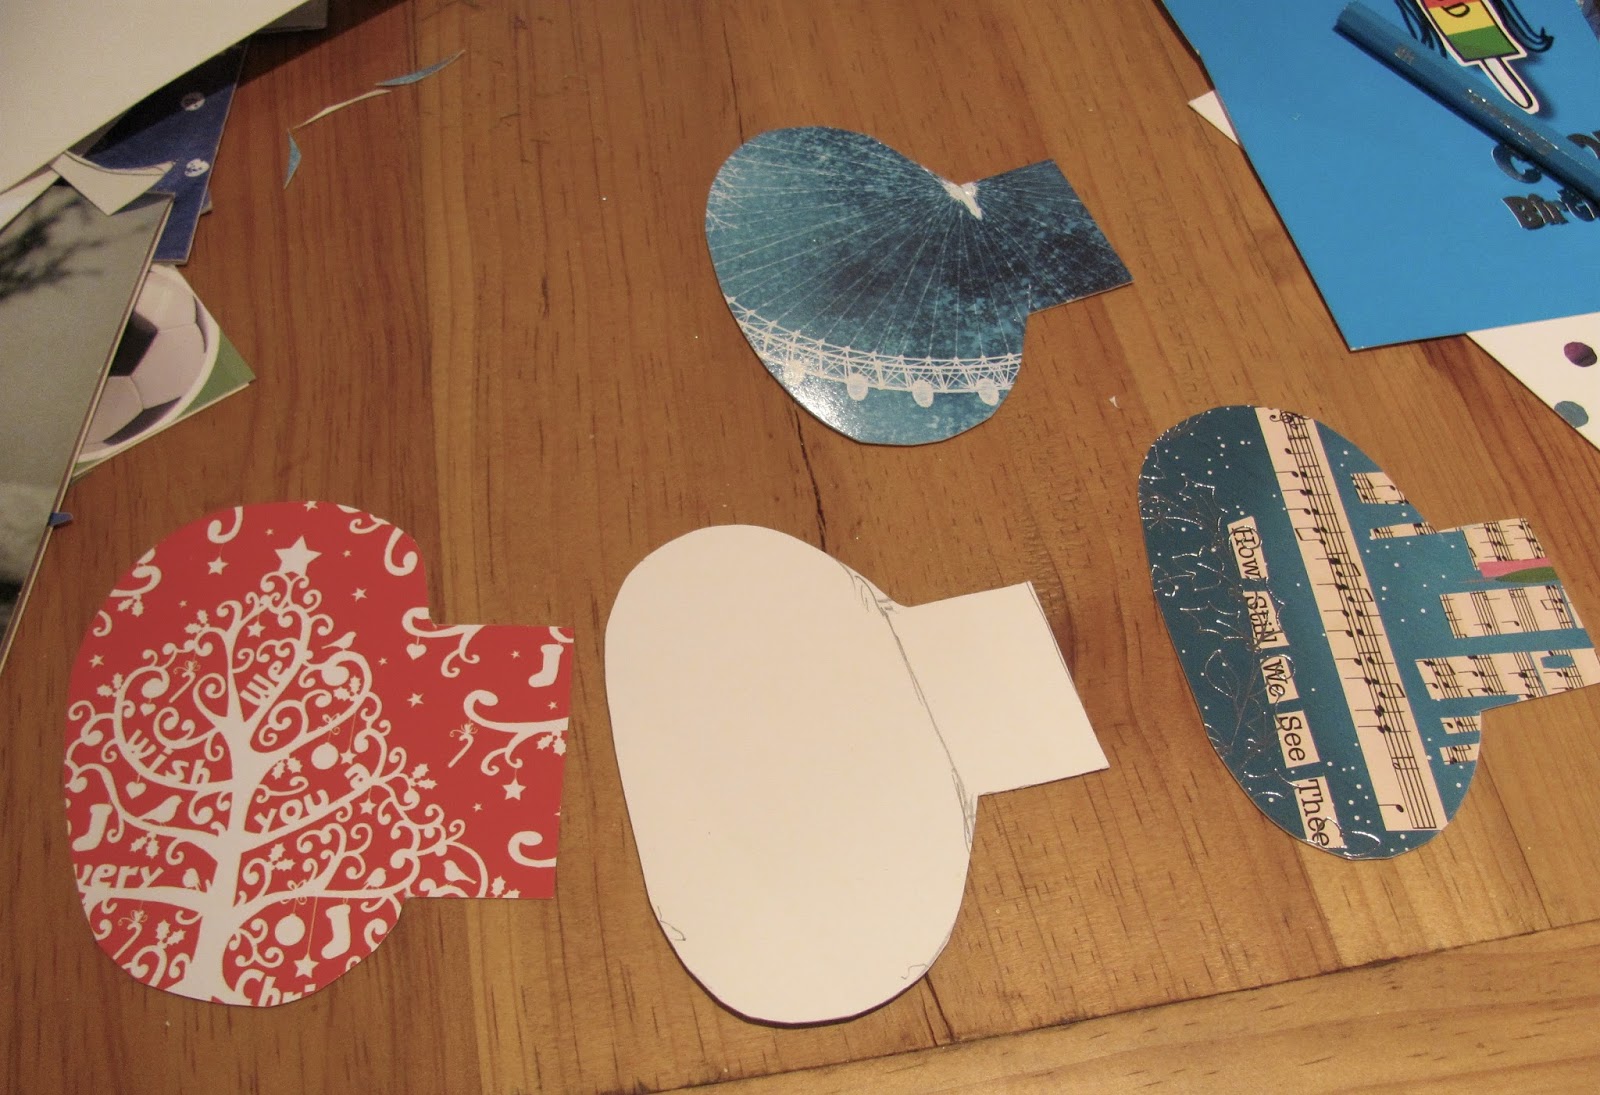
2. Find one predominantly red card for the head.  Draw an oval shape on the back of the picture (ours is about 10cm/4" by 7cm/3" wide, but makes yours smaller if you want), and draw a decent sized tab on one side. The body will be attached to this.


Use a picture of the Very Hungry Caterpillar to guide you, there are loads online - we actually had a VHC card in our collection which was handy, though still managed to get our caterpillar facing in the opposite direction...

3. Start drawing and cutting out body segments - make them a bit smaller than the head. They're a sort of jellybean shape with a tab on the side. Once you've drawn and cut one out - use it as a template for the others.


We made 14, plus 2 smaller jellybean shapes without tabs for the end.


4. Lay out your caterpillar on some plain paper. If like us you don't have a big enough piece, a sheet of newspaper will do. Use a ruler to draw a line on the newspaper to keep your caterpillar level.

Following the arched shape of the picture, arrange the body segments with the tabs behind, overlapping as you go. until you're happy with the shape.


5. Then, get a pencil and carefully place the palm of your other hand on the front section of the caterpillar so you don't move the card pieces, and draw around the bottom of the segments. Repeat along the length of the Caterpillar.
This makes it easier to see where each piece goes when you start gluing, but if you'd rather skip this stage and just start sticking, then do!

6. Push the segments out of the way before brushing some glue onto the head tab for the first body segment. When this is glued down, brush glue on this tab, plus some on the underside edge of the next segment, where they'll overlap, and so on.


If the pieces start popping up, don't worry - when you've got to the last segment, place something heavy, like a book on top, to weigh it down while the glue dries.

7. It may have stuck to the newspaper, but that's okay, just pull as much as you can away. It should be nice and sturdy, because of all those tabs - but if you want some extra strength then put sticky tape along the back.

8. We cut the eyes out of cards too as we just happened to have lovely sparkly yellow and green, but an easier option would be to draw the eyes on a piece of plain paper using bright yellow and green felt tips, then cut out and stick in place.


9. The antenna and small round mouth are cut from a card too - use sticky tape to attach the antenna to the back of the head.


10. Cut the stands from one of the thicker cards in your stash - use the plain half, and draw and cut out an arch shape. We made four, but the Caterpillar stays up fine with two.


11. Snip halfway down the stand from the top of the arch. Snip an extra sliver out to widen the slot. Then make the same size slot in a lower body segment - again snip out a bit extra so it's easier to push the stands into place. Sit it up on the stands. Push the stands up or down if you need to, to get the caterpillar to to sit level.


One other thing you could do that I haven't, is draw little legs on the stands with a black felt tip pen.


And there you go, a very hungry caterpillar, and a small dent in the old Christmas card collection...